Current public releaseGX 4.3.402 family · checked 27 July 2026

Access control,
without the guesswork.

A clear, visual training hub for everyday Protege GX work—from adding one user to scheduling doors and controlling elevator-floor access.

Training only · not connected to a live system. Built for the Windows desktop client. Confirm your installed build in About → Version.
3learning levels
18searchable workflows
71guide pages
33official ICT sources

Choose the job in front of you

Start with a picture.

These are explanations, not live controls. Each card jumps to the complete procedure and its safety checks.

00

Before the first click

Use the smallest reversible action.

Lost fobDisable that credential
Temporary suspensionDisable or expire the user
Permanent departureDelete only when authorized

Screen-by-screen walkthroughs

See it. Click it. Prove it.

Each sequence uses an official ICT demonstration or manual excerpt. Open any image full size before working in your own desktop client.

Basic · users and fobs

Add one user without missing a step.

Follow the screen sequence: open Users, complete the person and credential, then assign the approved access level.

Open the full Add user procedure
Official demonstration · orientation only · interface may differ from your installed build.
  1. Step 1Open Users

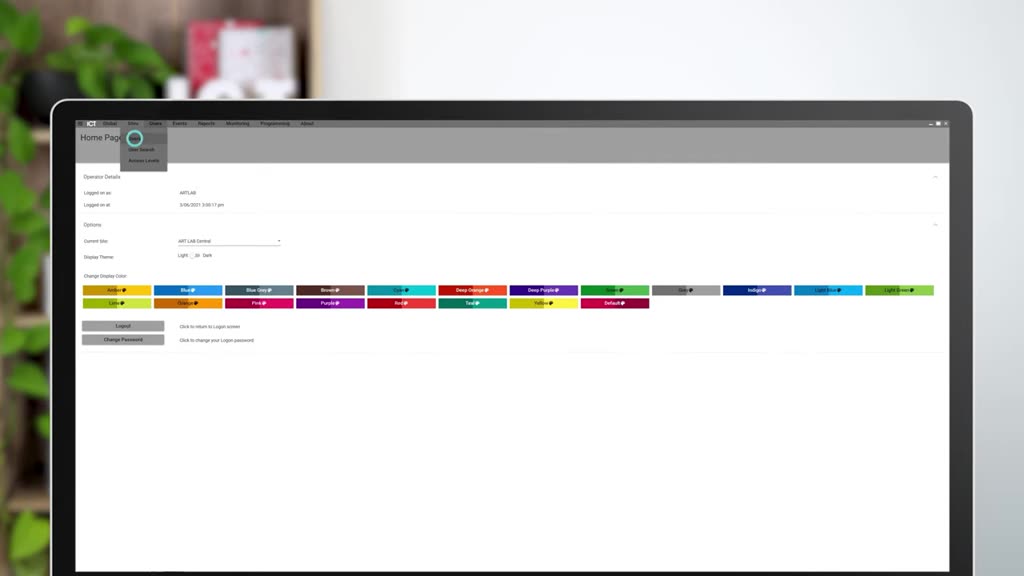
    Choose Users from the top menu, then open the Users record list.

    Adding a User in Protege GX · 0:48
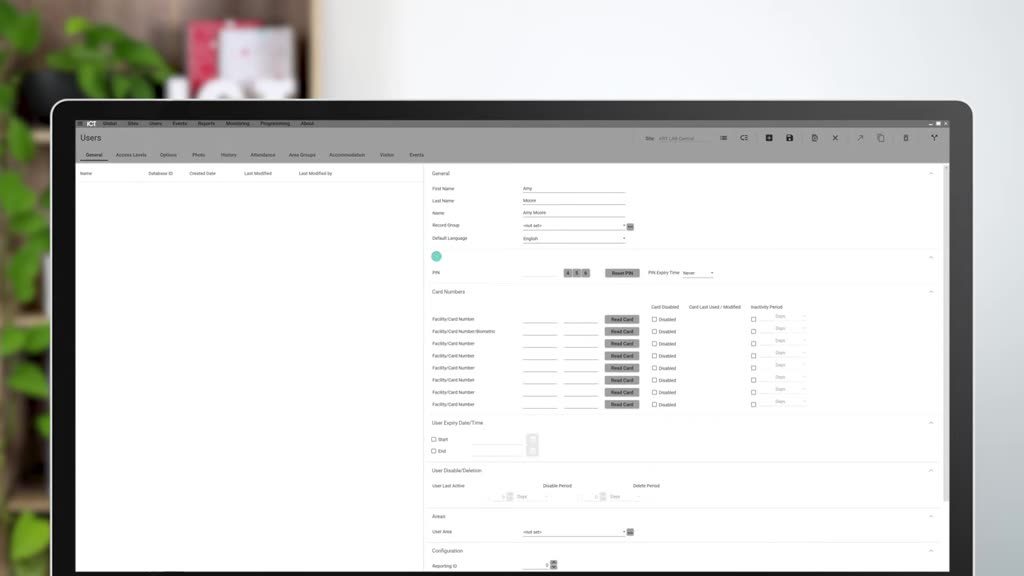
  2. Step 2Enter the person and fob

    Complete the General fields and use the credential format approved for your site.

    Adding a User in Protege GX · 1:14
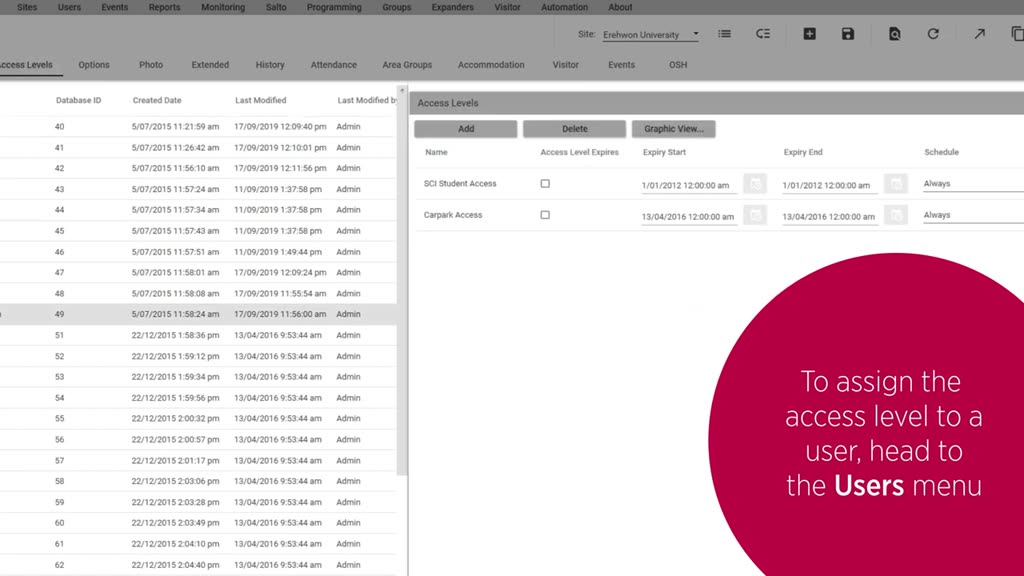
  3. Step 3Assign approved access

    Open Access Levels, add only the approved level, Save, and test one allowed and denied location.

    Adding a User in Protege GX · 1:40
Intermediate · doors and schedules

Make a door free by day and fob-only after hours.

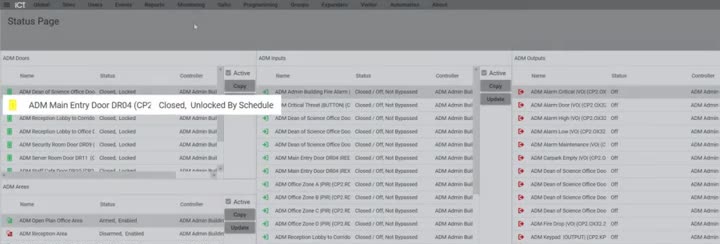
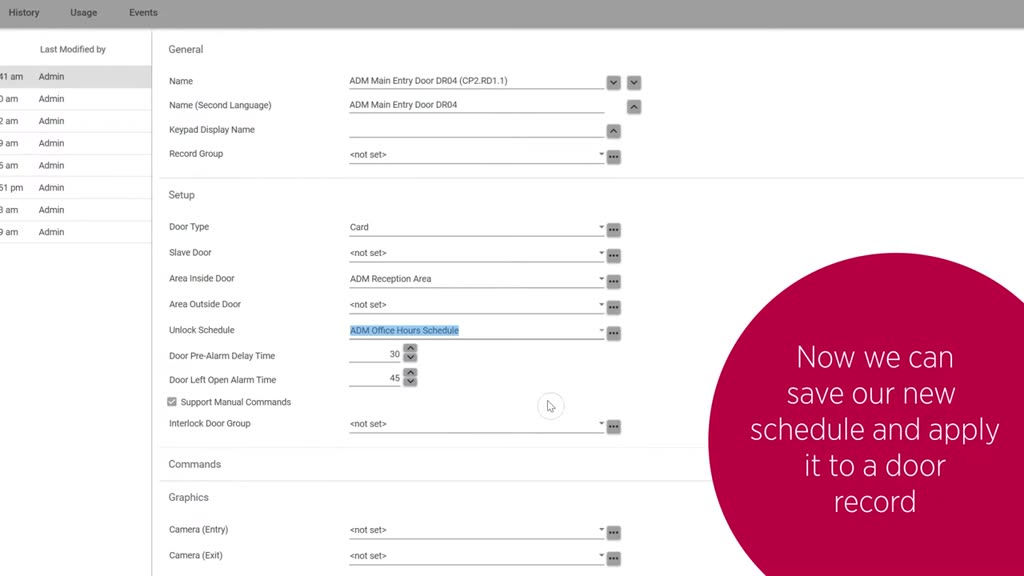
The reusable schedule is created first, applied to the door’s Unlock Schedule field, and then proved on the live status page.

Open the full door-schedule procedure
Official demonstration · orientation only · interface may differ from your installed build.
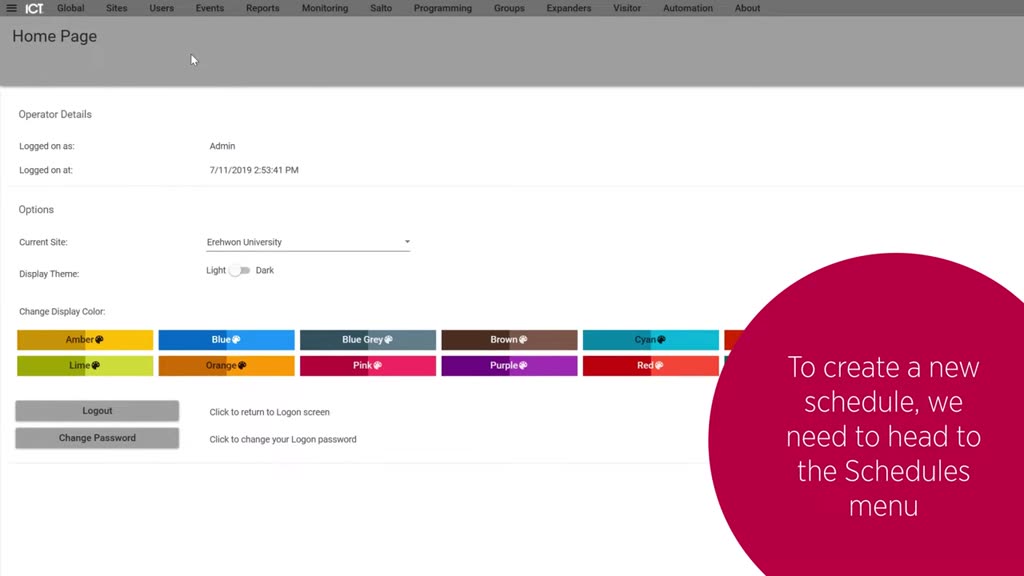
  1. Step 1Create the time rule

    Open Schedules, add the approved periods, operating days, and holiday behavior.

    Programming a New Schedule · 0:18
  2. Step 2Apply it to the door

    Select the exact door and place the public-opening schedule in Unlock Schedule.

    Programming a New Schedule · 2:04
  3. Step 3Prove the transition

    Confirm the live state says Unlocked by Schedule, then test closing time and after-hours fob access.

    Programming a New Schedule · 2:50

Advanced · elevator floors

Give both halves, then test from the correct car.

Elevator access depends on the installed integration. Confirm it first, grant only the approved floor and car permissions, then prove allowed and denied results.

Open the full elevator procedure
Official demonstration · orientation only · interface may differ from your installed build.
  1. Step 1Assign floor and car permissions

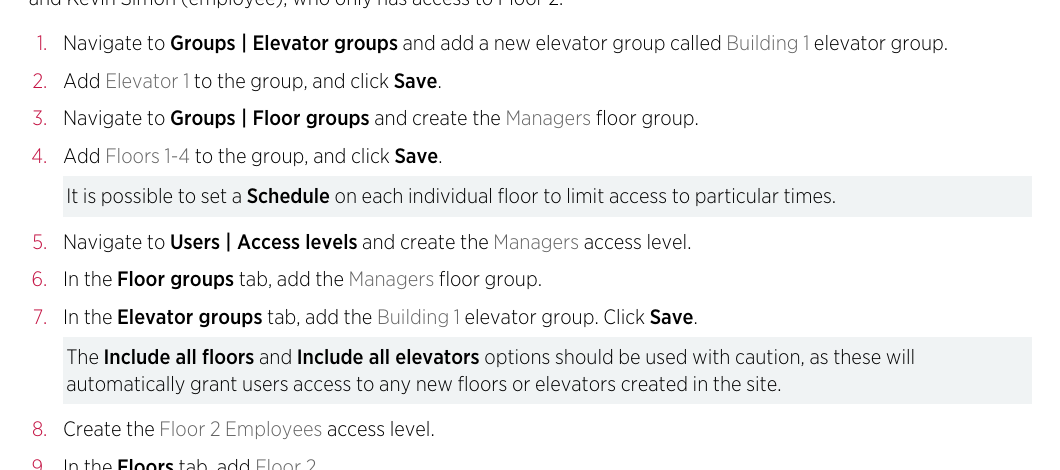
    Use an approved access level containing the required floor or floor group and elevator group.

    ICT AN-248 · page 20
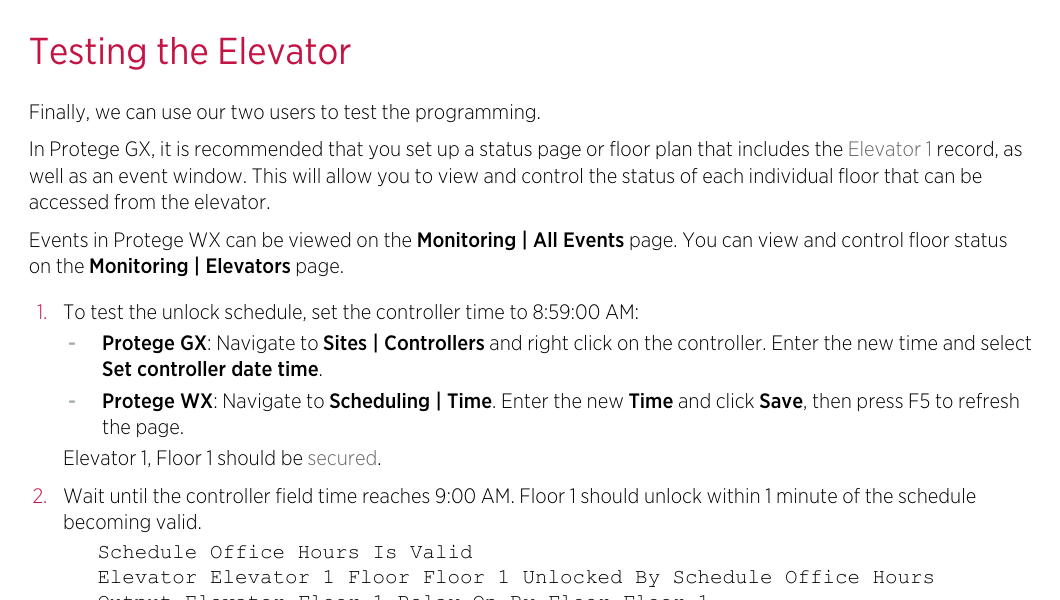
  2. Step 2Test allowed and denied

    Present the test fob in the intended car and verify one permitted and one restricted floor.

    ICT AN-248 · page 21
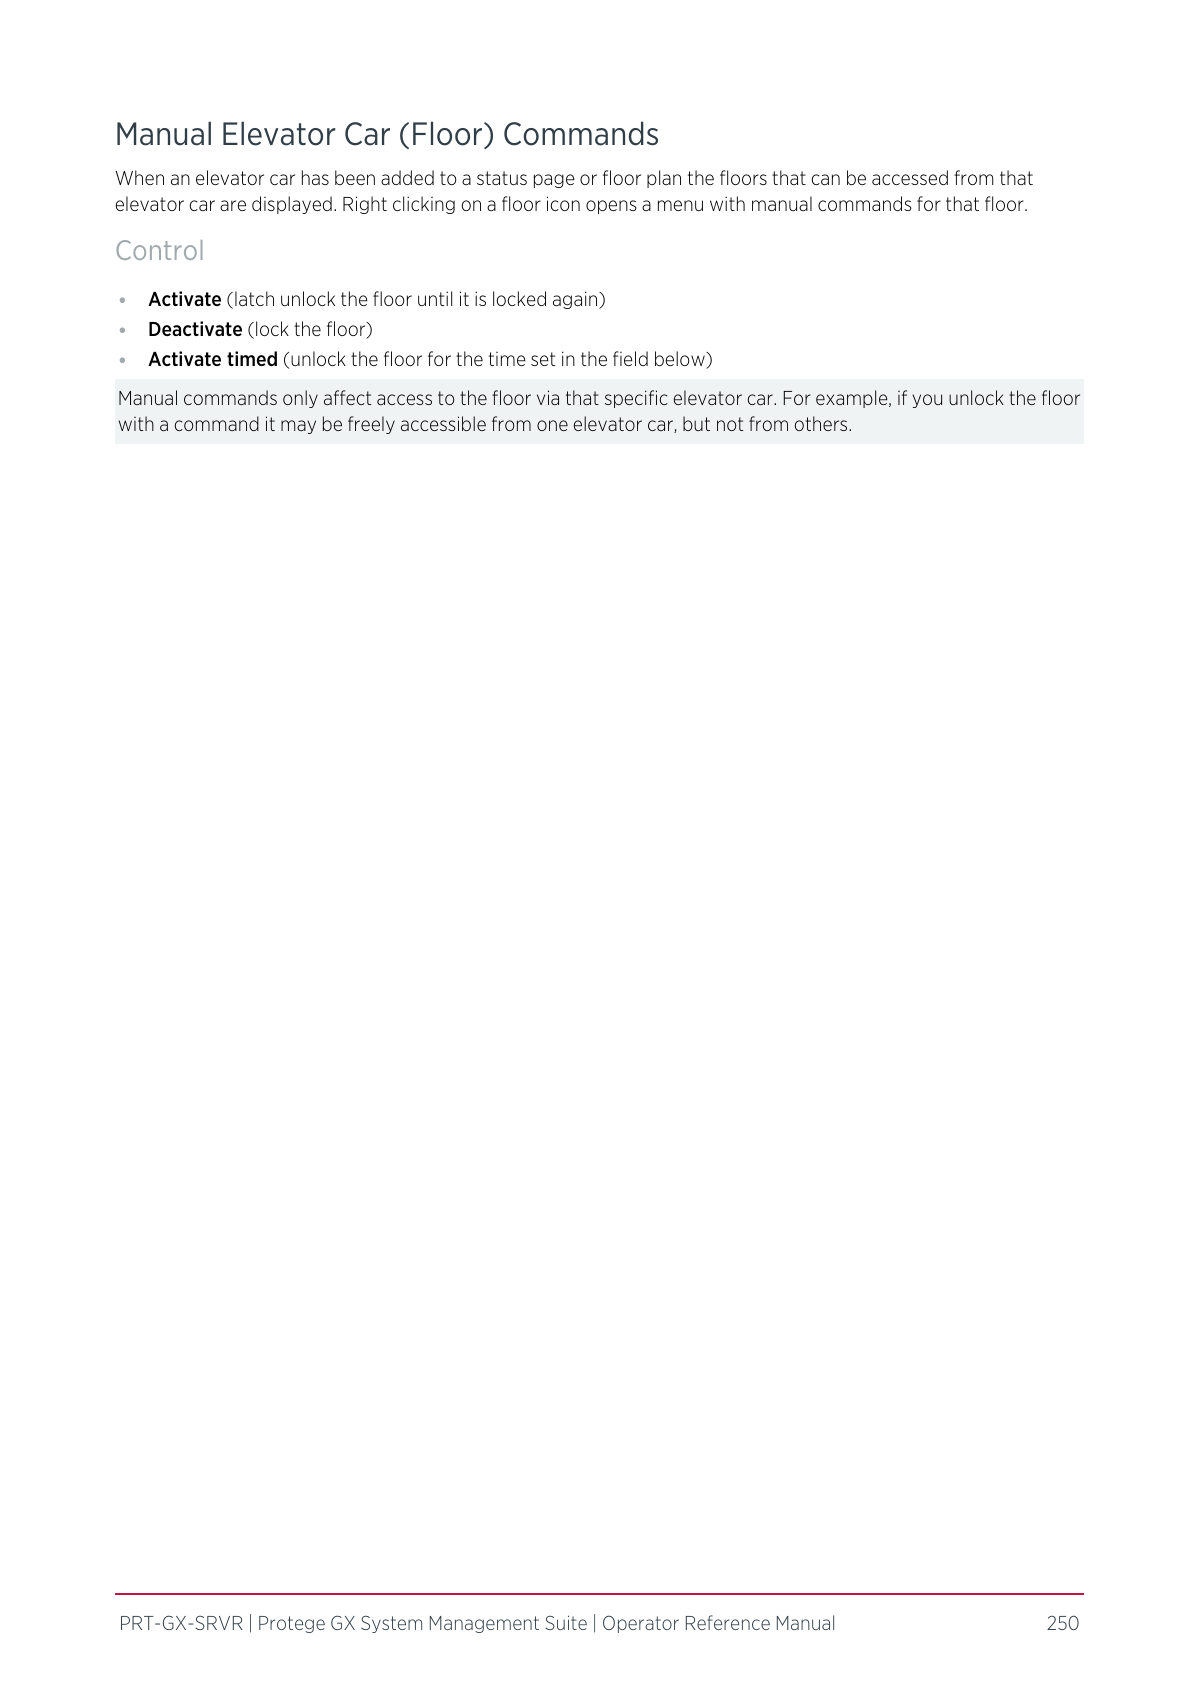
  3. Step 3Know the manual commands

    Activate timed is temporary; Activate is latched; Deactivate locks that floor through that car.

    GX Operator Reference Manual · page 250

Every level · verification

Saved is not the same as working.

A change is complete only when the record, live state, physical result, Events, and History agree.

Open the verification procedure
Official demonstration · orientation only · interface may differ from your installed build.
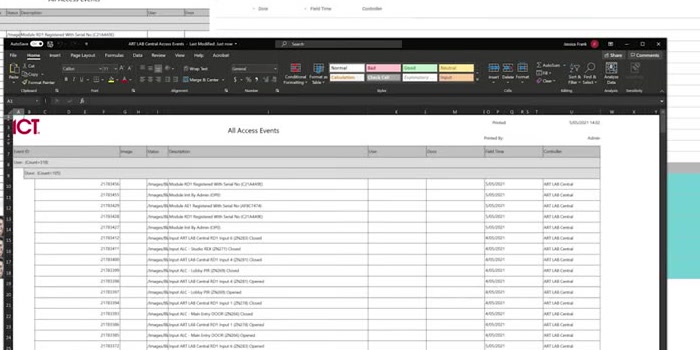
  1. Step 1Read the event

    Filter to the exact user, door or floor, and time. Read the reason before changing anything else.

    Viewing Event Reports · 0:35
  2. Step 2Preserve the evidence

    Export only the required date range and fields, using your approved privacy and retention process.

    Viewing Event Reports · 1:47
  3. Step 3Compare live and physical state

    Confirm the selected object, controller response, door or floor state, and resulting event.

    Creating a Status Page · 1:28

Learn in order

Three levels. One safe progression.

Each level explains what a feature means, when to use it, the exact path, how to verify it, and how to undo it.

01

Daily operator

Basic

Work safely with existing users, credentials, access levels, door commands, and event evidence.

  • Find and confirm the right user
  • Add, disable, expire, or delete safely
  • Temporary door unlock and normal Lock
  • Verify every change in Events
Open Basic guide
02

Access administrator

Intermediate

Build controlled permission packages and schedules without confusing free access, fob-only, and no access.

  • Access-level architecture
  • Schedules, holidays, and overnight periods
  • Automatic door opening
  • Calendar actions and reporting
Open Intermediate guide
03

Administrator / integrator

Advanced

Handle elevator permissions, structural door behavior, roles, diagnostics, and change control.

  • Low-level versus vendor HLI elevators
  • Floor access and manual commands
  • Door architecture and red lines
  • Controller health, backups, and rollback
Open Advanced guide

Find the job in front of you

Task finder

Search in plain English—try “lost fob,” “night,” “holiday,” “elevator,” or “lock.”

Filter by learning level

Showing 18 procedures

BasicAmber · reversible changeAdd a user and one fobCreate a person, record the credential, and assign an approved access level.Menu pathUsers → Users → AddShow exact stepsHide steps
  1. Confirm the person, printed Facility/Card numbers, dates, and approved access level.
  2. Enter the name and credential in one available row.
  3. Open Access Levels, add the approved level, then Save once.
  4. Wait for normal synchronization and test one allowed and one denied location.
Verify

Reopen the user and confirm identity, credential, dates, and access level. Read the result in Events.

Watch for

Never guess an access level or reuse a credential already assigned to someone else.

BasicAmber · reversible changeChange a user’s accessReplace one approved permission package without leaving an old grant active.Menu pathUsers → Users → user → Access LevelsShow exact stepsHide steps
  1. Read every level already assigned to the user.
  2. Add the new approved level and Save.
  3. Return to Access Levels, remove the old row if required, and Save again.
  4. Test a newly allowed location and one that should now be denied.
Verify

Only approved levels remain and Events names the expected level for the successful test.

Watch for

Another assigned level may still grant the same door or floor.

BasicAmber · reversible changeStop one lost or stolen fobDisable one credential while keeping the person and any other credentials intact.Menu pathUsers → Users → user → General → credential rowShow exact stepsHide steps
  1. Confirm the user with two identifiers and locate the exact missing credential.
  2. Enable Card disabled for that credential row.
  3. Save and allow normal synchronization.
  4. Confirm the missing credential is denied while other approved credentials still work.
Verify

The credential remains recorded but disabled, and a later presentation produces a denied event.

Watch for

Do not delete the entire user or overwrite the missing number before preserving the audit reference.

BasicAmber · reversible changeSuspend all access for one userTemporarily stop every credential without destroying the user record.Menu pathUsers → Users → user → OptionsShow exact stepsHide steps
  1. Confirm whether the suspension is immediate or should begin at a defined time.
  2. Enable Disable user for an immediate stop, or use the approved end date/time.
  3. Save, refresh, and check Events at the effective time.
Verify

Every credential for that user is denied while the record and history remain available.

Watch for

Confirm the site time zone before relying on a future expiry.

BasicRed · shared / high impactDelete a user permanentlyRemove the complete person record only after authorization and retention review.Menu pathUsers → Users → select exactly one record → DeleteApproval / SOP requiredDeletion is not a routine undo. Never delete a shared access level, schedule, group, door, floor, or elevator.Show exact stepsHide steps
Approval / SOP requiredDeletion is not a routine undo. Never delete a shared access level, schedule, group, door, floor, or elevator.
  1. Prefer Disable user until permanent deletion is confirmed.
  2. Capture the current record, History, Usage, and required evidence.
  3. Reconfirm the name and credential immediately before Delete.
  4. Search again and verify the credential is denied.
Verify

The record is gone, the credential is denied, and the operator action is auditable.

Watch for

Deletion is not a routine undo. Never delete a shared access level, schedule, group, door, floor, or elevator.

BasicAmber · reversible changeTemporarily unlock a doorRelease one door for its programmed lock activation time, then confirm it secures itself.Menu pathMonitoring → Status Page / Floor Plan → right-click doorShow exact stepsHide steps
  1. Confirm the exact door, live state, and authorization.
  2. Choose Unlock — not Unlock latched and not a lockdown command.
  3. Supervise the entry and watch the live state.
  4. Confirm the door closes, latches, and returns to Locked/Secure.
Verify

Live status, the physical latch, and Events all agree that the door returned to secure.

Watch for

A closed door is not automatically an electrically locked door.

BasicAmber · reversible changeLock a door backSend the normal Lock command after a manual or latched unlock.Menu pathMonitoring → Status Page / Floor Plan → right-click door → LockShow exact stepsHide steps
  1. Check that nobody is in the door path and egress remains safe.
  2. Choose Lock and watch the live state.
  3. Physically confirm the door closes and latches.
  4. If it unlocks again, inspect the Unlock schedule instead of repeating commands.
Verify

The door is secure and Events records the normal Lock command.

Watch for

Lock is not Lockdown. Clear removes lockdown; it is not an ordinary unlock button.

IntermediateAmber · reversible changeCreate a reusable scheduleBuild a valid/invalid clock that can later be assigned to doors, access levels, floors, or outputs.Menu pathSites → Schedules → AddShow exact stepsHide steps
  1. Give the schedule a clear, site-approved name.
  2. Add each start/end period and select the operating days.
  3. Attach the correct holiday group and holiday mode.
  4. Save, then assign the schedule to the exact record that should follow it.
Verify

Graphic View matches the intended week, holiday behavior, and overnight boundaries.

Watch for

A schedule does nothing until it is assigned. Overnight periods may need to be split at midnight.

IntermediateRed · shared / high impactFree by day, fob-only by nightLet the public enter freely during opening hours while valid credentials continue after hours.Menu pathSites → Schedules + Programming → Doors + Users → Access LevelsApproval / SOP requiredDo not create fob-only mode by disabling the reader or the users.Show exact stepsHide steps
Approval / SOP requiredDo not create fob-only mode by disabling the reader or the users.
  1. Create or verify the approved public-opening schedule.
  2. Assign it to the door’s Unlock schedule.
  3. Keep approved user access levels valid during intended fob-only hours.
  4. Test before opening, at opening, at closing, and after hours.
Verify

Valid door schedule = free. Invalid door schedule + valid user level = fob-only. Invalid both = no access.

Watch for

Do not create fob-only mode by disabling the reader or the users.

IntermediateAmber · reversible changeAdd a holiday exceptionPrevent normal weekday periods from behaving as ordinary days on a closure date.Menu pathSites → Holiday Groups, then Sites → SchedulesShow exact stepsHide steps
  1. Add the exact holiday or date range to the approved holiday group.
  2. Attach that group to the schedule.
  3. Set each relevant period’s holiday mode deliberately.
  4. Test one normal date and the holiday date.
Verify

The schedule is valid or invalid on the holiday exactly as the approved matrix requires.

Watch for

Adding a holiday alone does not automatically lock doors.

IntermediateRed · shared / high impactBuild an access levelCombine where, when, and permitted direction into a reusable permission package.Menu pathUsers → Access Levels → AddApproval / SOP requiredInclude all doors, floors, or elevators also includes records created in the future.Show exact stepsHide steps
Approval / SOP requiredInclude all doors, floors, or elevators also includes records created in the future.
  1. Name the level according to the approved convention and set its operating schedule.
  2. Add only the required doors, door groups, floors, and elevator groups.
  3. Set each item’s direction and schedule deliberately.
  4. Assign the level to one test user before wider rollout.
Verify

The test matrix proves intended access and at least one denied location remains denied.

Watch for

Include all doors, floors, or elevators also includes records created in the future.

IntermediateRed · shared / high impactSchedule a one-off door overrideUse a licensed Calendar Action for an event with an explicit beginning and end.Menu pathSites → Calendar ActionsApproval / SOP requiredCalendar Actions can override ordinary schedules. Avoid No end date.Show exact stepsHide steps
Approval / SOP requiredCalendar Actions can override ordinary schedules. Avoid No end date.
  1. Confirm the event route, exact doors, start, end, and recurrence.
  2. Choose the approved Lock or Unlock Latched action.
  3. Save and review the resulting calendar entry.
  4. Verify every door relocks when the action ends.
Verify

The action starts and ends once, affects only listed doors, and leaves no open-ended recurrence.

Watch for

Calendar Actions can override ordinary schedules. Avoid No end date.

AdvancedRed · shared / high impactPut elevator floors on a fobGive a user both required halves: permitted floors and the elevator cars or interface points.Menu pathUsers → Access Levels → Floors / Floor groups + Elevator groupsApproval / SOP requiredKONE, Otis, Schindler, MCE, TKE, and low-level control do not share one universal recipe.Show exact stepsHide steps
Approval / SOP requiredKONE, Otis, Schindler, MCE, TKE, and low-level control do not share one universal recipe.
  1. Identify the exact low-level or vendor HLI elevator integration.
  2. Prefer assigning an existing approved elevator/floor access level.
  3. If building a level, add only the approved floor group and elevator group.
  4. Assign it to one test user and test an allowed and denied floor from the correct car.
Verify

The credential works only through approved cars to approved floors, during approved times.

Watch for

KONE, Otis, Schindler, MCE, TKE, and low-level control do not share one universal recipe.

AdvancedRed · shared / high impactRemove elevator or floor accessRemove the permission path without affecting unrelated credentials or users.Menu pathUsers → Users → Access Levels; inspect shared level UsageApproval / SOP requiredDo not delete the floor, elevator, group, or shared access-level record.Show exact stepsHide steps
Approval / SOP requiredDo not delete the floor, elevator, group, or shared access-level record.
  1. List every level assigned to the user; another level may still grant the floor.
  2. Remove the unwanted level from that user when possible.
  3. If a shared level must change, check Usage and obtain approval before editing it.
  4. Test the denied floor and an unrelated floor that should still work.
Verify

The target floor/car is denied and remaining approved elevator access is unchanged.

Watch for

Do not delete the floor, elevator, group, or shared access-level record.

AdvancedRed · shared / high impactFree floor by day, fob-only after hoursUse a low-level elevator car’s per-floor Schedule as an unlock schedule.Menu pathProgramming → Elevator cars → Schedules and areasApproval / SOP requiredSchedule verify can reverse a manual floor command within one minute.Show exact stepsHide steps
Approval / SOP requiredSchedule verify can reverse a manual floor command within one minute.
  1. Confirm low-level control or a vendor integration with the same documented semantics.
  2. Select the exact car and floor row.
  3. Apply the approved free-access schedule and review Schedule verify.
  4. Test both transitions, an approved credential, and a denied credential.
Verify

Schedule valid = floor free; schedule invalid = credential required.

Watch for

Schedule verify can reverse a manual floor command within one minute.

AdvancedRed · shared / high impactTemporarily unlock one elevator floorControl one floor through one selected elevator car from an approved status page.Menu pathMonitoring → Status Page / Floor Plan → exact elevator car → floorApproval / SOP requiredVendor HLI behavior and Schedule verify may differ from low-level relay control.Show exact stepsHide steps
Approval / SOP requiredVendor HLI behavior and Schedule verify may differ from low-level relay control.
  1. Confirm the integration supports GX manual floor commands.
  2. Choose Activate timed for a defined window; use Activate only for an approved latch unlock.
  3. Watch the live floor state and Events.
  4. Choose Deactivate at the end and verify other cars if required.
Verify

Only the intended floor through the intended car changed, then returned to secure.

Watch for

Vendor HLI behavior and Schedule verify may differ from low-level relay control.

AdvancedRed · shared / high impactChange structural door settingsUnderstand the configuration layers before an integrator changes hardware behavior.Menu pathProgramming → DoorsApproval / SOP requiredOutput polarity, strike timing, fire interfaces, reader mapping, and Commands are integrator-only.Show exact stepsHide steps
Approval / SOP requiredOutput polarity, strike timing, fire interfaces, reader mapping, and Commands are integrator-only.
  1. Capture the door type, lock output, REX/REN, areas, schedules, interlock, and current events.
  2. Identify the design owner for each affected layer.
  3. Change one approved item in a maintenance window.
  4. Test access, egress, contact, forced/held alarms, schedule transitions, and rollback.
Verify

The intended change works and every unrelated safety/security behavior remains intact.

Watch for

Output polarity, strike timing, fire interfaces, reader mapping, and Commands are integrator-only.

AdvancedGreen · read / routineCheck controller and download healthSeparate a saved server record from the field controller’s actual state.Menu pathController record / approved diagnostics + EventsShow exact stepsHide steps
  1. Confirm the correct Site and controller.
  2. Record online/offline state and Last downloaded time.
  3. Inspect the approved download diagnostics and related events.
  4. If normal synchronization stalls, capture evidence and escalate.
Verify

The relevant controller received the change and the physical result matches the record.

Watch for

Do not use Force Download or Update module as the first response; Update module takes hardware temporarily offline.

The scheduling idea that matters most

Three door states

The door’s schedule controls free passage. The user’s access level controls whether an approved credential works.

Door schedule valid

Free access

No fob is required. The door is unlocked by schedule.

Door schedule invalid · user valid

Fob-only

The door is locked, but approved credentials can release it.

Door schedule invalid · user invalid

No access

The door stays locked and the credential is denied.

Example weekdayPublic lobby

This is a teaching example. Use your building’s approved times, holidays, and access matrix.

Fob-onlyFree accessFob-only

Door Unlock Schedule: valid 8:00–18:00 · approved user access: valid outside public hours

Elevator permission model

A fob needs both halves.

“Which floors?” and “through which elevator cars or interface points?” are separate questions. A low-level elevator access level normally needs both.

AFloor / floor groupWhere the user may go
BElevator / groupWhich cars deliver access
Usable permissionTest from the correct car
Stop firstIdentify low-level, KONE, Otis, Schindler, MCE, TKE, or another HLI before changing floor access.
Official ICT application note showing how floor and elevator permissions are assignedOpen full size
Assign both halvesICT AN-248 · page 20 · official manual excerpt
Official ICT application note showing an elevator-access test sequenceOpen full size
Test allowed and deniedICT AN-248 · page 21 · official manual excerpt

Look closer

Screenshot reference wall

More official ICT examples for common fields. Every image opens at full size and is labeled as a demonstration—not your live system.

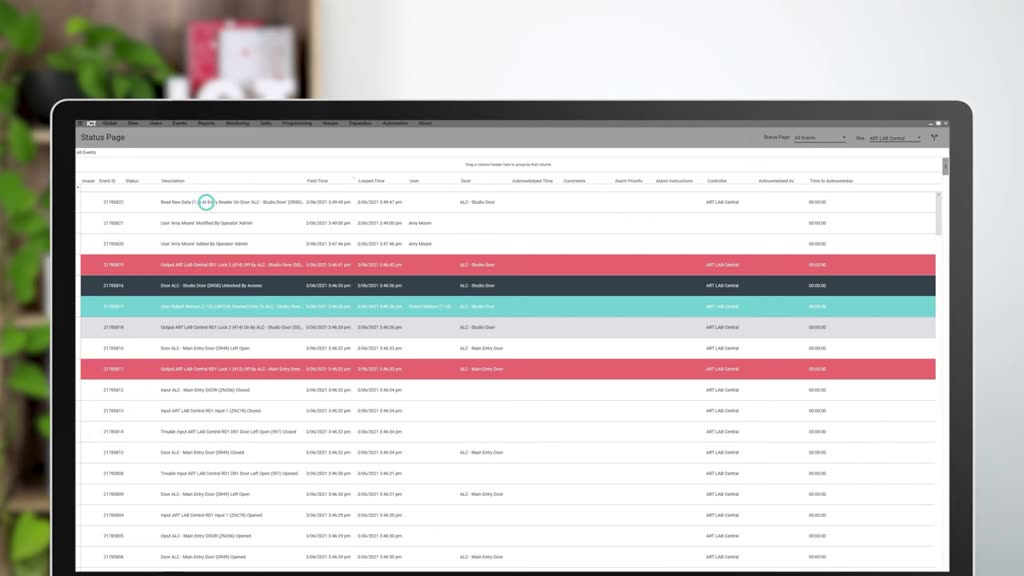
Find an unknown fob

Look for the Raw Card Read event before assigning the credential.

Adding a User in Protege GX · 2:16
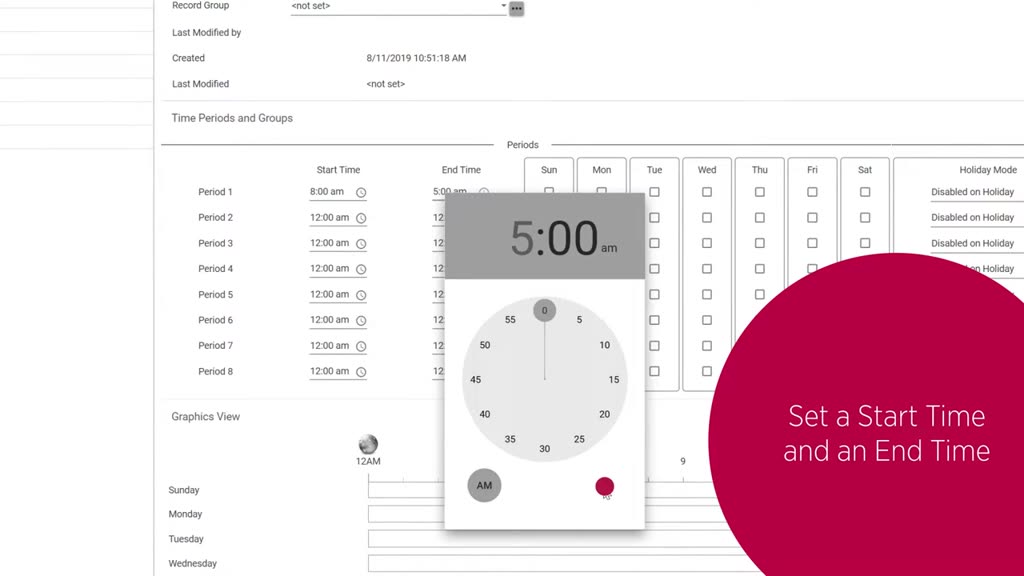
Set the time period

Start and end times define when the schedule is valid.

Programming a New Schedule · 0:24
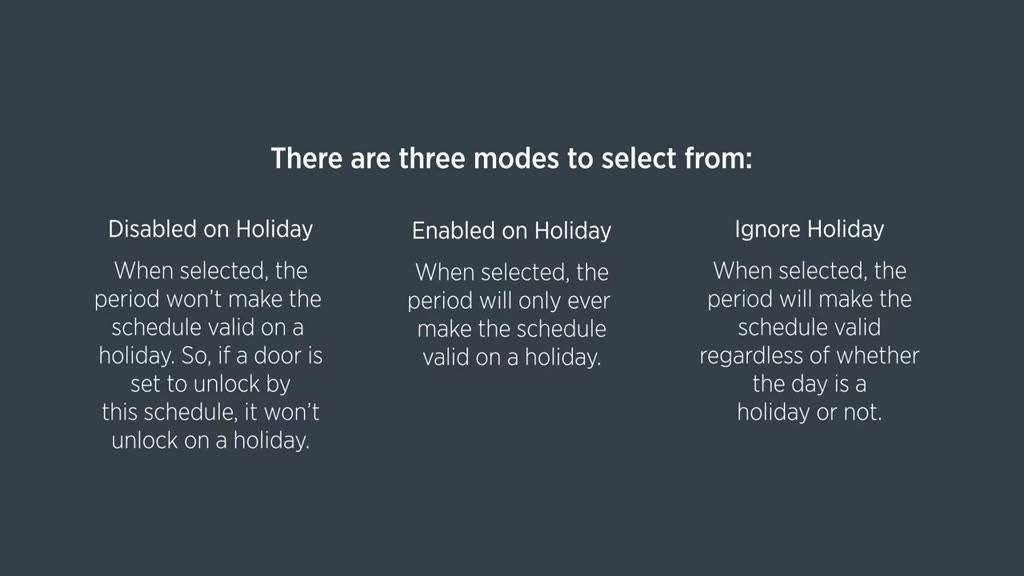
Choose holiday behavior

A holiday date alone does not automatically lock a door.

Programming a New Schedule · 1:12
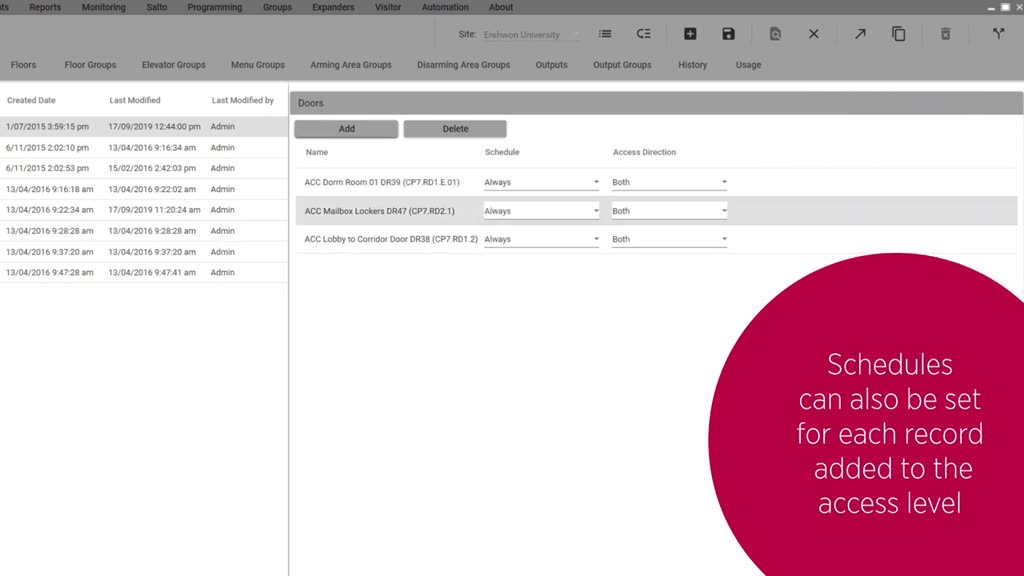
Control when the fob works

This access-level schedule is different from the door’s free-unlock schedule.

Configuring a Basic Access Level · 0:52
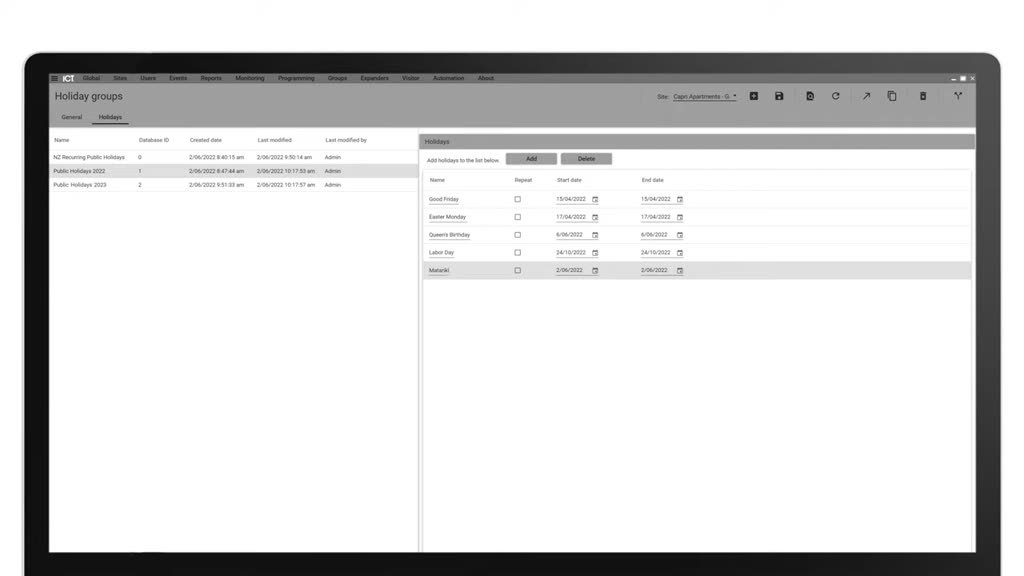
Add holiday dates

Confirm the correct Holiday Group and year before saving.

Adding a New Holiday · 0:17
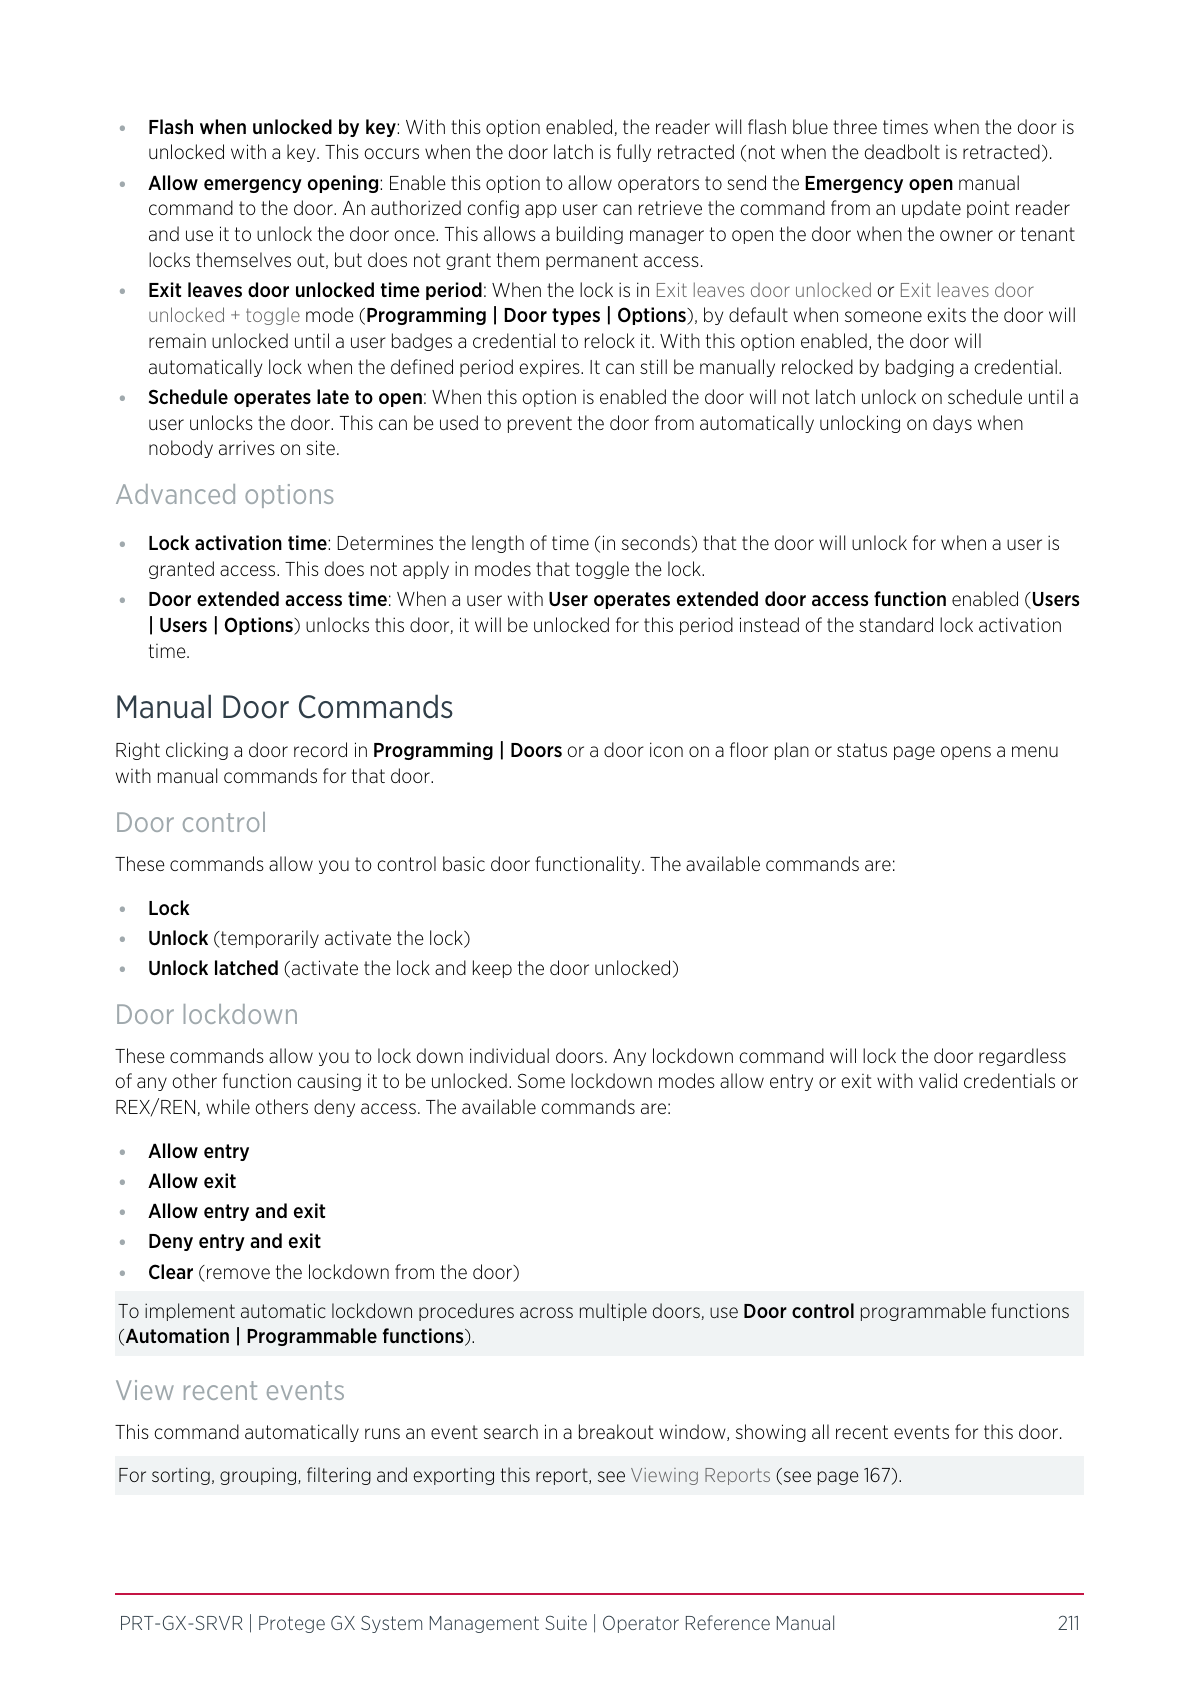
Decode door commands

Unlock, Unlock latched, Lock, Lockdown, and Clear are not interchangeable.

GX Operator Reference Manual · page 211

Similar words, different outcomes

Door command decoder

Routine operators should normally use only temporary Unlock and normal Lock under an approved SOP.

UnlockTemporary release

Returns after the programmed lock activation time

Unlock latchedStays unlocked

Requires another command, schedule, or process to relock

LockNormal secure command

Can be reversed by a valid enforced unlock schedule

LockdownEmergency security override

Overrides ordinary unlocking; emergency SOP only

ClearRemove lockdown

Not an ordinary unlock control

Take it to the desk

The complete guide set

Five print-ready PDFs with exact paths, numbered steps, risk labels, verification checks, rollback notes, screenshots, and official sources.

Evidence, not folklore

Official source set

Use built-in Help first when a field differs. It best matches the software installed at your site.

Before · during · after

Confirm. Change one thing. Prove the result.

01

Confirm authorization, Site, exact record, current state, and rollback.

02

Save once and wait for normal synchronization.

03

Test one allowed and one denied action; check Events and History.